Arabesque Fringe Purse - Free Pattern
Arabesque Fringe Purse
Free Crochet Pattern
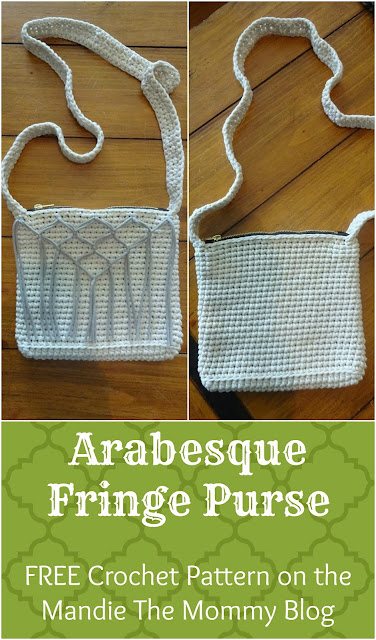
I have another new pattern for you! This is my Arabesque Fringe Purse. It uses Bernat Maker Home Dec yarn. If you're not a fan of fringe, this bag is a great blank canvas for your favorite embellishments! Get the downloadable/printer friendly version here: Ravelry Link.
This post contains affiliate links. Thanks for supporting my blog!
Materials:
- 2 colors bulky yarn (Suggested yarn: Bernat Maker Home Dec)
- J Hook
- Scissors
- Tapestry needle
- Zipper or other closing hardware of choice (OPTIONAL)
- 2 colors bulky yarn (Suggested yarn: Bernat Maker Home Dec)
- J Hook
- Scissors
- Tapestry needle
- Zipper or other closing hardware of choice (OPTIONAL)
Notes:
- Chain 1 at the beginning of the round does not count as a stitch.
- Join each round with a slip stitch to the first stitch of the round.
- Stitch counts are indicated in parenthesis.
- When making the strap, ch 1 and turn at the beginning of each row.
- Gauge: 1” = approx. 3.5 stitches and 4 rows. Bag measures about 8” x 8.5” when laying flat. Gauge is not crucial to this project.
Stitches & Abbreviations:
Ch – Chain
Sc – Single Crochet
Sc dec – Single crochet decrease
Hdc – Half double crochet
St – Stitch
Sl st – Slip stitch
BLO – Back loop only
Ch – Chain
Sc – Single Crochet
Sc dec – Single crochet decrease
Hdc – Half double crochet
St – Stitch
Sl st – Slip stitch
BLO – Back loop only
Pattern:
Bag:
Ch 26.
1. Sc in the second chain from hook and in each ch across, 2 sc in last ch, sc into the other side of the chain across, 2 sc in last ch. (52 sc)
2. Ch 1. 2 sc in first st, hdc in next 24 sts, 2 sc in next 2 sts, hdc in next 24 sts, 2 sc in last st. (56 sts)
3. Ch 1. In BLO for this round only, sc in each st around. (56)
4. - 26. Ch 1. Sc around. (56)
27. Ch 1. Sc around, putting 1 sc dec in each of the 2 corners. (54)
Cut yarn.
Strap:
Attach yarn to corner of bag (See photo for placement. When laying flat, strap ends should be centered in the corners of the bag.)
1. Ch 1. Sc in first st and in next st. (2)
2. Ch 1, turn. Sc 2. (2)
Repeat row 2 until strap is approximately 40” long.
Attach yarn to corner of bag (See photo for placement. When laying flat, strap ends should be centered in the corners of the bag.)
1. Ch 1. Sc in first st and in next st. (2)
2. Ch 1, turn. Sc 2. (2)
Repeat row 2 until strap is approximately 40” long.
Note: You can
omit or add rows to adjust the strap. I wanted a cross body purse and I am
short, but you could add rows for a longer strap or omit some for a shoulder
bag instead.
Sl st strap to opposite corner of bag. Ch 1 and sc evenly down one side of the strap. Cut yarn.
Join yarn to the other side of the strap. Ch 1 and sc evenly
down the other side of the strap. Cut yarn.
Weave in all ends.
Optional: Install zipper or other closing hardware.
Optional: Install zipper or other closing hardware.
Fringe:
Begin by finding the 25 centermost stitches of round 26 on
the front of the bag. Cut 10 long strands of contrast color (around 48” long). Hold
2 strands together and knot them around the first of the 25 center stitches.
Skip 5 stitches, then knot 2 more strands around the next stitch. Do this until
you have 5 knots with 4 strands coming from each knot. (See photo for
placement)
Take the 2 right strands from the first knot and the 2 left strands from the next knot and tie another knot, creating a diamond shape.
Continue this way with each set of 4 strands. Repeat for each “row” of knots,
leaving the first and last two strands of each row hanging.
Trim fringe to your liking.
This pattern and all photos are property of Mandie's Fiber Arts. Please DO NOT copy, repost, redistribute, or claim as your own this pattern or any of the pictures. If posting about the pattern, link back to the Ravelry listing or blog post and credit me as the designer. Feel free to tag me in social media posts with your creations. As always, you may certainly sell your finished projects.


Comments
Post a Comment